Friday, January 8, 2010

Snow Pictures from Friday

Last night, just over 1" of snow fell. It shouldn't take long to melt, but we only had 10 holes clear of snow during the week.


Instead of using the snow shovel, Mercedes was able to clear the sidewalks with a back-pack blower in no time.

Tim is blowing off the parking lot with the tractor blower. This snow is light and dry.

With the snow still hanging in the trees, the clubhouse area offered a ton of nice photos.


No one is making the turn right now.

First tee looks open!

Thursday, January 7, 2010

2010 Tree Work

On Wednesday, January 6th, the Greens Department started using a 45' lift as part of our continuing tree management program. Our goal is to remove dead and hanging branches from cart path and in-play areas. The Red Oaks found on property are prone to Bacterial Leaf Scorch which affects the transfer of water within the tree. It may only affect a branch at first, but can spread through the vascular system into other areas. Removing dead branches is the best way to manage it. While we are out, we are removing some low branches that block sun and thin turf.

Jose needs two things before he gets started. First, he has a saftey harness and chaps to protect himself from falling and a misstep with the chain saw. Second, he needs a little coffee to be alert.
Mercedes is working in front of Jose to remove low suckers and overgrowth. He is in there somewhere.

The OB line on #2 was overgrown on the right side.

Once Jose has identified a dead limb, he executes a "three cut removal". An intial first cut to the bottom of the branch allows for give while he cuts it from the top away from the tree. The second cut is a regular downward cut several inches from the trunk of the tree. Since branches are so heavy and well-attached to the tree, a single cut will just rip off the bark once the branch is cut 90% of the way through. Jose's intial cut keeps that from happening. The third cut is a regular cut at the collar of the branch and trunk. This cut is simple, but is the most important to insuring a health healing process.


You can see how a section of the limb closest to the trunk is cut after the bulk of the branch is already down.

Jose is able to reach almost any branch with a 45' lift.

Some areas, such as #6, had many problems with the Baterial Leaf Scorch. Two small trees in this area had to be removed and Jose is busy limbing up any dead material to keep the bacteria from spreading.

Wednesday, January 6, 2010

Aeration- The process and benefits

Before the playing surfaces can be groomed day-to-day for golfers, the soil the turf is grown in must support healthy turf and healing from wear and tear.
Every surface in this picture is aerated, including the green which will see atleast three treatments per year.
The green is aerated and the cores are allowed to dry for several hours. Generally, we use 1/2" tines @ 1.5" spacing. In the summer we deep tine with solid 3/8" tines which don't produce cores.

Several guys use snow shovels to scoop up all of the cores. In the past we used a mechanical core harvester; however, it created scuffs and rutts.

After the cores are scooped up, the green is blown off to remove any remaining debris.
With 5% of the turf surface now open, we take apply most of our yearly amendments. We use high calcium-lime and organic based fertilizer for the calcium content. Gypsum and polycoated potash are used for potassium.


This is high-cal lime. It offers 4 times more calcium than what you will normally find at a garden store.
#18 Green under a layer of topdressing sand. This is also allowed to dry for several hours before it is drug in using a mat made out of cocco leaves. The topdressing sand is a special size which is tested to make sure it is compatable with our native soil.

#1 Green after all of the amendments are applied, the sand is drug in, and it has been rolled to remove any imperfections.

This is an upclose look of a completed green.

This is our goal. 6" roots in mid-July will help us get through the dog days of summer.

This is the view from your golf ball. Without regualer aeration, it will be looking at humps and bumps. Plus without the air and amendments the turf itself won't be healthy enough to make it through the season.

Tuesday, January 5, 2010

New Construction of a Putting Green

A new, USGA putting green cost over $50,000 and can take up to 6 months to be ready for golfers. However, when a green is no longer able to sustain regular play throughout an entire golf season, these new greens may be necessary. Crofton has 4 USGA greens installed from 2004 to 2006 and one modified USGA green installed in 2006. The new greens can be found on #6, #7, #13, #17, and the Chipping Green.


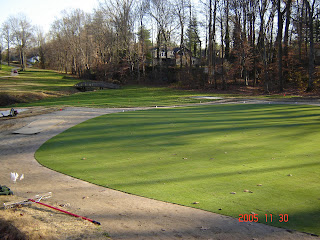
#13 Green held water which breeds disease and causes mower damage in 2005.
#17 Green had shade issues that didn't allow it to dry out.
Let's Get Dirty!


Large bulldozers are needed to shape the sub soil which must match the shape of the finished product.


A "shell" is left for the growing medium, drainage, and sod.


The drainage is carefully measured out for spacing and pitch.


The trenches have a 6" drain pipe and are covered with pea gravel.


The drainage on #13 is a herring bone pattern.


2" of pea gravel is spread evenly over the drainage pipe. This layer will suspend the water in the growing medium so the grass plants will have only just enough water to live.


The growing medium is 80% sand and 20% organic matter and soil. Eventhough this seems too sandy to grow grass in, the gravel underneath allows the water to stay in the growing medium.


The finished product will be cut at just over one-tenth of an inch, so fine grading is important.


Sod that has had all of the native soil washed off of it is carefully laid down. The plywood keeps the grass as smooth as possible.


After the green is sodded, the rest of the rough sod is laid to finish.


#13 Green just 6 months later.


This is #6 Green after just over 3 months.

Rebuilding A Signature Par 3 - #17

#17 is a challenging, up hill, 200-yard, par-3. Although it is tucked in woods which makes it tough to maintain, the hole is in a beautiful location. Starting in 2005, the members at Crofton Country Club has invested over $100,000 to give this hole a makeover.
In November, 2005 the green was rebuilt to USGA specifications. It would now have a sand base to aid in drainage. Several trees were removed to the south side of the green's complex to increase sunlight.

New, A-4 bentgrass was used for the playing surface.

In August of 2006, the approach was no longer able to meet the new standards set by the green.

After the sod was removed, the soil was heavily aerated and amended to allow for maximum root development.
The approach continue to to receive frequent, seasonal aeration.

Without turf, large quantities are gypsum and calcium were applied. Twice a year, additional maintenance treatments are applied to keep the grasss healthy.
New drainage was installed in the wettest locations.

L-93 sod was laid on the new approach which is a vigorous variety of bentgrass.

The green's complex is looking fine in the summer of 2007, the tee box area was still an issue.


The Spring of 2008 saw another big change for #17. The undersized, misplaced tee boxes were removed.
New irrigation, cart paths, and landscaping were installed in the centered location.

By the early Summer of 2008 the new zoysia tee box was receiving frequent mowing and play was allowed on in June. The new 10k fan at the green was key in keeping the green cool and dry during the muggy summer.


In 2009, #17 received just a few touches. The Crofton Senior Men's Association (CSMGA) added their Memorial Garden and Bench at the tee box. New sand in the bunkers gave the hole a signature taste.